Initial Setup – Pure Storage

Here is a quick guide to initial set up of Pure Storage. This is assuming you have already racked the array and have configured the management network.

Array Configuration

First things, first – change password

You will need three IP addresses for management

  1. Controller 1 management IP address
  2. Controller 2 management IP address
  3. Virtual IP address
  • Login to the array (default username and password is pureuser/pureuser)

Pure Login Page

  • Once logged in, first things first, lets change the password for the default user. Pure Storage only allows a single local user – pureuser.
    • For security and auditing purposes, the array should be a directory service such as Active Directory.
  • Go to SYSTEM –> Users –> Local Users

Pure User Page

  •  Click on three dots on the pureuser row

Edit user

  • Select “Set Password” and enter a complex password.

Set Password - Pure

Changing name of the array

The name of the array can be changed by:

  • Navigate to SYSTEM –> Configuration –> Array

Pure - dashboard system

  • In the middle of the screen, under Array Summary, you can see the name of the array. Click on the three dots on the name row to change the name. Pretty simple.

Networking

Selecting the Networking menu item under SYSTEM –> Configuration will provide you the management IP addresses as well as replication IP address, if configured.

A single IP address is required for replication. This is a virtual IP that is bound to all four 10Gb/s replication links. If you don’t want to use all four links, you will need to contact Pure Storage support to have them disable two ports. This can’t be done through GUI.

Alerts

This is where you configure email notification. Add in your recipients, relay host and sender domain.

SNMP

As the name suggest, this is where you configure SNMP if you want to.

System Time

Configure the NTP server here.

Directory Service

This is where you configure binding to a directory service. Steps below are for Active Directory

To configure this, you create new groups in AD.

  • Array Admins – full access to the array. Has keys to the kingdom kind of access
  • Storage Admins – Can perform storage functions such as create LUNs, etc
  • Read Only – AS name suggests, can only view and not make any changes

Next is to create a service account in AD to use as the binding user. This doesn’t need any special access in AD, can be regular AD user. Just needs to be able to search AD.

Under Directory Service in Pure Array:

  • Select enable
  • URI: Give the name of the dmain in ldap://<domain.com> format
  • Base DN: Provide domain to search for e.g. DC=<domain>,DC=<com>
  • Bind User: Enter the service account that was created earlier
  • Bind Password: Enter password for the service account
  • Group Base: Enter the path to where the three above groups (Array Admins, Storage Admins, Read Only) have been created. E.g. OU=<SAN>, OU=<Tech>
  • Array Admin Group: Name of the SAN Admin group
  • Storage Admin Group: Name of the Storage Admin group
  • Read Only Group: Name of the Read Only group

Save and test. A prompt will appear with the test result. If all are green, you are good to go.

Banner

You can use this to publish a EULA/Warning notice at the login screen.

UI

This is basically to set the timeout for the user interface.

 Syslog Server

As name suggests, configure your syslog server here.

SSL Certificate

Use this to generate self-signed certificate, create certificate signing request, import and export certificates. Good idea to replace the self signed certificate with a signed certificate.

SMI-S

This is disabled by default. You can enable it if you want to use it. Basically provides a unified interface to manage multiple storage vendors.


That’s it. Pretty simple right. Pure Storage is pretty simple to use yet very powerful. Hope this was useful.

Cisco UCS FI 6296 Unresponsive after reboot

This is a late post for an issue I came across with our Cisco UCS 6296 Fabric Interconnects. It may come handy to someone.

Issue: The FI 6296 will become unresponsive after a reboot. In my case, it was after a firmware upgrade. The error in our case was that the system was incorrectly detecting that the fans were spinning in the opposite direction and as a precautionary measure, FI was shutting itself down. This also affects Nexus 5596.

The issue is detailed in the Cisco Field Notice FN – 64094 – Nexus 5596/UCS FI 6296 – System Failed to Boot after a Power Cycle, Microcode Upgrade Required

http://www.cisco.com/c/en/us/support/docs/field-notices/640/fn64094.html

Or use the Cisco Bug Search Tool for CSCun00720

The issue exists on FI’s that have the microcode 1.0. To resolve this issue, the microcode needs to be upgrade to 1.1.

To check the microcode version in your FI, perform the following

  • SSH into one of the FI’s (I use putty)
  • Type in connect nxos. This will take you into the NX OS configuration
  • Type show sprom sup | inc H/W
  • If the H/W Version is 1.0, then you are affected by the bug. Contact Cisco TAC to upgrade the microcode to 1.1

Hope this is helpful to someone.


Configuring Veeam with HPE StoreOnce

So you are implementing Veeam and need a dedupe appliance for repository but not sure which one to select. I was in the same position an year back. There was an inclination from higher up for HPE StoreOnce. But there wasn’t enough data out there (or maybe I couldn’t find it) on the expected dedupe ratios with Veeam backup.

Finally after multiple back and forth with HPE and a written guarantee on a minimum expected dedupe ratio, we bought HPE StoreOnce 5100. Here is my experience.

Configuration

  • 2 x 16Gb FC HBA’s
  • 4 x 10Gb Ethernet (2 x dual port card)
  • Capacity: 106TB

FC connection between StoreOnce and a bare metal Windows server with Veeam gateway role.

StoreOnce Setup

Assuming the initial configuration has been completed for StoreOnce, perform the following steps to create a StoreOnce catalyst as a Veeam repository.

HPE StoreOnce Catalyst deduplication is not global to the appliance but rather local to individual catalyst stores. This can have a significant impact how you design catalyst stores for use as repositories. 

  • Create a StoreOnce Catalyst client. The name needs to be named “Veeam“. Create a password. You will use this within Veeam to add the repository

Screen Shot 2017-06-10 at 08.50.06

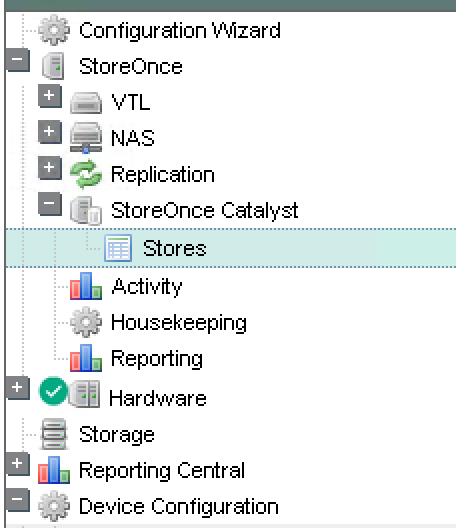
  • Next go to Stores within Catalyst to create a store. You will add this as a repository within Veeam.

Screen Shot 2017-06-10 at 08.56.59

  • Next add the client you created in the first step to the store, enabling “Access

Screen Shot 2017-06-10 at 08.57.51

  • Next step would be to add this Catalyst store to Veeam, assuming all fabric zoning has already been configured to the gateway server.


Veeam Configuration

  • Add the gateway server to Veeam as a backup proxy.
  • Add new backup repository in Veeam.

Screen Shot 2017-06-10 at 09.06.06.png

  • Select Deduplicating storage appliance
  • Select HPE StoreOnce

Screen Shot 2017-06-10 at 09.08.36.png

  • Select checkbox Use Fibre Channel connectivity. This adds in COFC- to the server name. This is required if connecting through FC. Add in the FQDN of the StoreOnce after COFC- e.g. COFC-mystoreonce.mycorp.com

Screen Shot 2017-06-10 at 09.10.12

  • In credentials, add the Veeam client that was created in StoreOnce earlier
  • In the Gateway Server, select the gateway server
  • If everything is configured correctly, select you will select the Catalyst store

Screen Shot 2017-06-10 at 09.36.24.png

  • For the concurrent tasks, this will depend on the number of connections between the gateway server and StoreOnce

Screen Shot 2017-06-10 at 09.42.34

  • Review the settings and finish the wizard. Congratulations you have just added in a StoreOnce Catalyst store to your Veeam


Deduplication

This is what we are seeing one year after implementation

General repository (predominantly Windows server backups) – 16:1

Microsoft Exchange backups – 23:1

File Services backup – 23:1

Hope this is helpful to someone.

Partitioning a HPE MSL4048 Tape Library

The HPE MSL4048 tape libraries can be partitioned into logical libraries to match the number of tape drives installed.

You can have 2 full height tape drives in MSL4048 or 4 half-height tape drives.

In this example, we are partitioning the physical library into two logical tape libraries using two half-height tape drives. The physical library is connected to the hosts (servers) through FC switches.

  • Ensure the tape drives are connected to slots 1 & 3 in the library. If moving the tape drives to different slots, ensure you change the FC zoning as the WWPN is for the slot and not the tape drive (makes sense – ability to replace drives without requiring any additional change)


  • Login to HPE Command View (IP address of the tape library) using a web browser. Remember to login as an AdministratorScreen Shot 2017-05-13 at 11.58.10


  • Go to Configuration –> System


  • Change Select Mode to “Two Logical Libraries” and select “Apply” This option will only be available if the tape drives are in correct slots.
    Screen Shot 2017-05-13 at 12.08.23


  • Ensure all other settings are correct to match your environment. Once complete, drive 1 will be allocated the left enclosure and drive 2 takes up right enclosure.


  • If mail slot is enabled, logical library 1 (tape drive 1) will lose 3 slots to mail slot reducing its slot count to 21 while logical library 2 (tape drive 2) will have 24 slots.
    Screen Shot 2017-05-13 at 12.12.04
  • Now configure FC zoning to map servers to their own logical tape libraries.

Using VMware Health Analyzer and VCSA with External PSC

  1. If you are using VMware Health Analyzer on a vCenter Server Appliance with an external PSC, you will get the following errorScreen Shot 2017-04-25 at 20.40.41
  2. To resolve this, you need the security token service URL of the PSC appliance. Login to the web client and navigate to the vCenter ServerScreen Shot 2017-04-25 at 20.41.48
  3. Select your vCenter
  4. Select Manage –> Advanced Settings
  5. Search for “psc”Screen Shot 2017-04-25 at 20.42.56
  6. Copy the contents of vpxd.sso.sts.uri and paste it to the SSO field in VMware Health Analyzer
  7. That should fix the issue.